Hello!
Today we will be going through how to install Xcode onto your Mac. So first, go to the Mac App Store. There you can search for Xcode. Then press the download button. It will then ask you for your Apple id and password. Fill out that information and wait for Xcode to download.
Once Xcode downloads then press the icon and press the button that says create a new Xcode project.

Then it will take you to this screen:

This is screen that displays the different starter templates that Apple provides you with. The one that we will choose is Empty Application. So with Empty Application selected press Next. Now you come to this screen:

First fill out the product name. Call it "My First App." Then fill out the Organization Name. This is usually your company's name. The Company Identifier is usually "com." with the Organization Name in all lowercase. Leave the Class Prefix as is, and make the Devices "iPhone." Finally leave "Use Core Data" unchecked. Then Press "Next."
Choose where you want to put the Xcode project. I would put it on the Desktop, but wherever you want to is fine. Leave the bottom part looking like this:
Choose where you want to put the Xcode project. I would put it on the Desktop, but wherever you want to is fine. Leave the bottom part looking like this:

Now press "Create." Congratulations, you just created your first Xcode project!
Now press the carrot next to "My First App" in the upper left hand corner.
Now press the carrot next to "My First App" in the upper left hand corner.

Now press the carrot next to the folder called "My First App."

Click on the file called AppDelegate.m Right at the top of the file is a block of code like this.
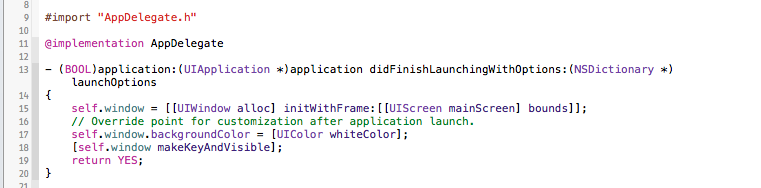
Delete these four lines:

Then between the two curly braces on lines 14 and 16 there is a line that says return YES; Put your cursor right before the 'r' in return and press enter. Now in the line above the return YES; statement start to write in ALL CAPS "NSL." You should get a pop-up that looks like this:
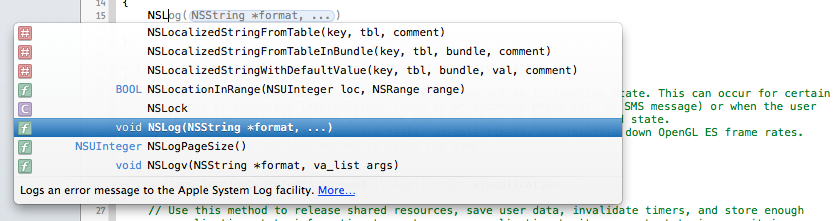
This is called code completion. It is an extremely helpful tool and will save you a lot of time when typing extra long code statements. Xcode provides you with a list of possible statements that you can type at that time. At this time we want the line that starts with NSLog. Then when the line that is highlighted is the same in the screenshot press enter. It should look like this now:

With the blue part still highlighted start write this: @"Hello World This Is My First App" So it looks like this:

Now go to the upper left hand corner of Xcode and press the run button. The panel should like this.

Press the button all the way to the left. WHAT!!! You get this dreaded icon that pops up.
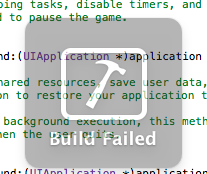
But not all is lost. Navigate back to the code you just wrote. In that line there should be a red stop sign in the gutter next to the line.

There is an error! It says"Expected ";" after expression." So Xcode is telling you that there should be a semicolon after the line you just wrote. This is a very common problem when coding. All it is a missing semicolon. The reason why you need a semicolon after every Objective-C statement you write is because it tells Xcode that this line is done move on to the next one. So add the semicolon after the closing parentheses and run the app again. The build should succeed and the Xcode Simulator should pop up, but wait nothing appears on the screen! This is because the code we just wrote does not display anything on the screen. It outputs something to the Debug Area. So go to the top right corner of Xcode and press the middle button.

At the bottom of Xcode you should see an area slide up that looks like this .

Congratulations! You made "Hello World This Is My First App appear! (If you are not seeing this, make sure that the two buttons that are highlighted in blue in the screenshot are selected)
Wow! Great work! You:
That is a long list of accomplishments. Great work today! Next we will talk about the basics of Objective-C: Data Types, Classes, Objects, and Methods!
I will post again soon and remember keep learning!
Thank you,
Zachary Cmiel
The PoKoBros
Wow! Great work! You:
- Installed Xcode
- Created your first Xcode project
- Wrote your first line of code
- Solved your first code error
- Built your first app
- Debugged your first app
That is a long list of accomplishments. Great work today! Next we will talk about the basics of Objective-C: Data Types, Classes, Objects, and Methods!
I will post again soon and remember keep learning!
Thank you,
Zachary Cmiel
The PoKoBros
 RSS Feed